Support Center
Find answers, set up your assessments, or get help with Eye — AI-powered proctoring for Google Forms and custom platforms.
- Home
- Support
Getting Started
Eye is an AI-powered online proctoring platform that helps educators, recruiters, and organizations conduct secure assessments. It integrates with Google Forms and can also be embedded into custom platforms via API or widget.
Eye uses event-driven AI monitoring to detect suspicious behavior during assessments — such as tab switching, multiple faces on camera, or the candidate leaving the frame. When events are detected, Eye captures evidence and logs them for administrator review. Eye does not perform continuous surveillance; it only records when meaningful events occur.
- Browser: Chrome, Firefox, Safari, or Edge (latest 2 versions)
- Camera: Working webcam (built-in or external)
- Microphone: Required if audio monitoring is enabled by the administrator
- Internet: Stable connection (minimum 1 Mbps upload)
- Device: Desktop or laptop recommended; mobile support varies by integration
No. Eye runs entirely in the browser. Candidates simply click their assessment link, allow camera access when prompted, and begin. No downloads, plugins, or special software are required.
Both. Eye offers a native Google Forms™ add-on for users who want to proctor forms-based assessments, and a standalone widget/API for organizations that want to embed proctoring into their own platforms or LMS.
Assessment Administration
Setting up an assessment in EYE allows you to monitor and maintain the integrity of your exams while using your existing platform. This guide walks you through creating and configuring your first assessment.
- You must have an active Eye account
- At least one domain has been added to your account (see How to Add a Domain)
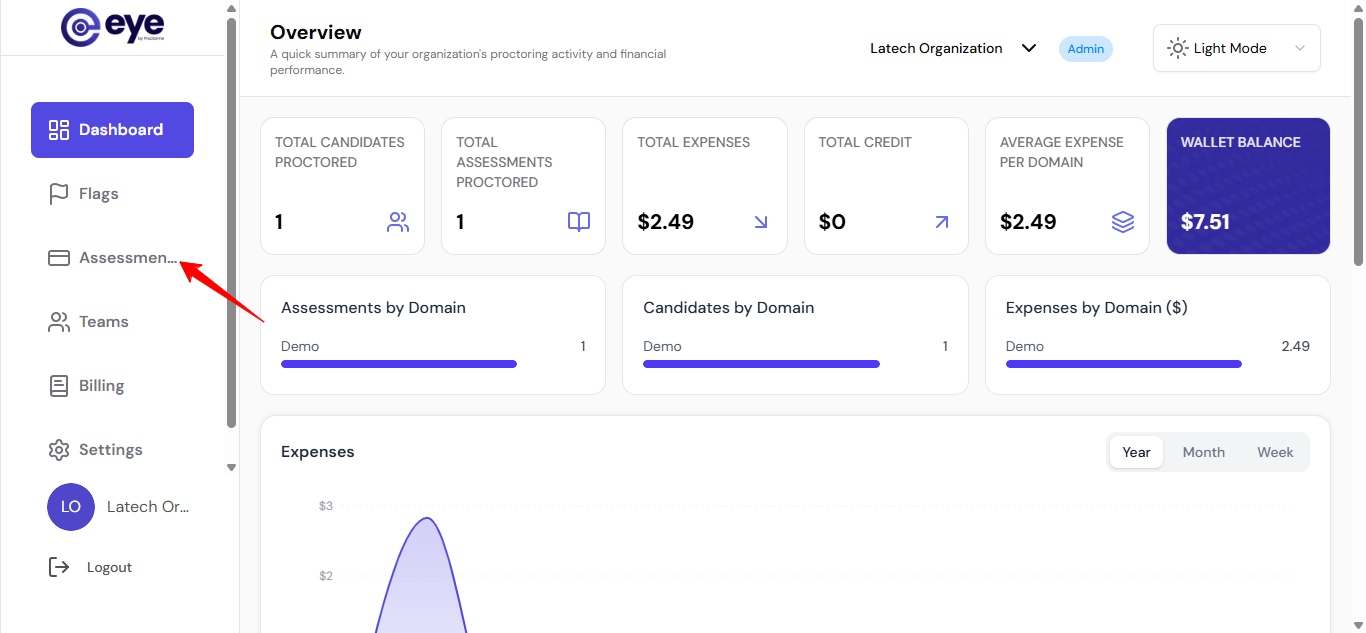
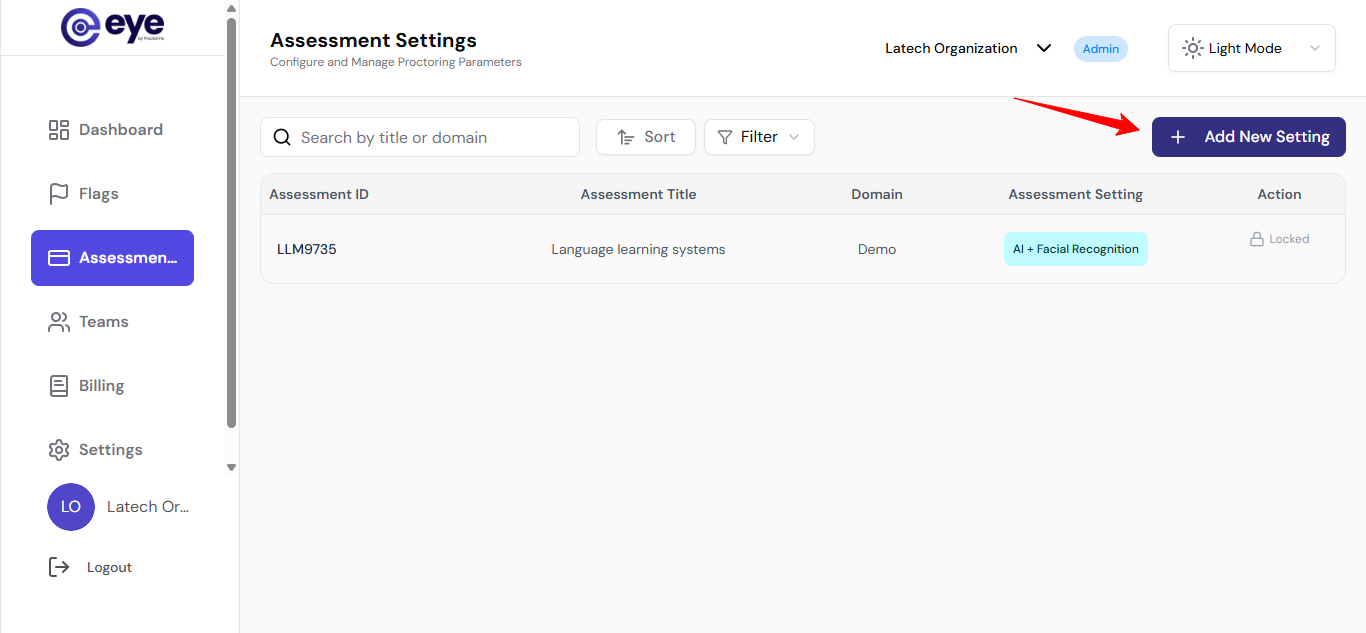
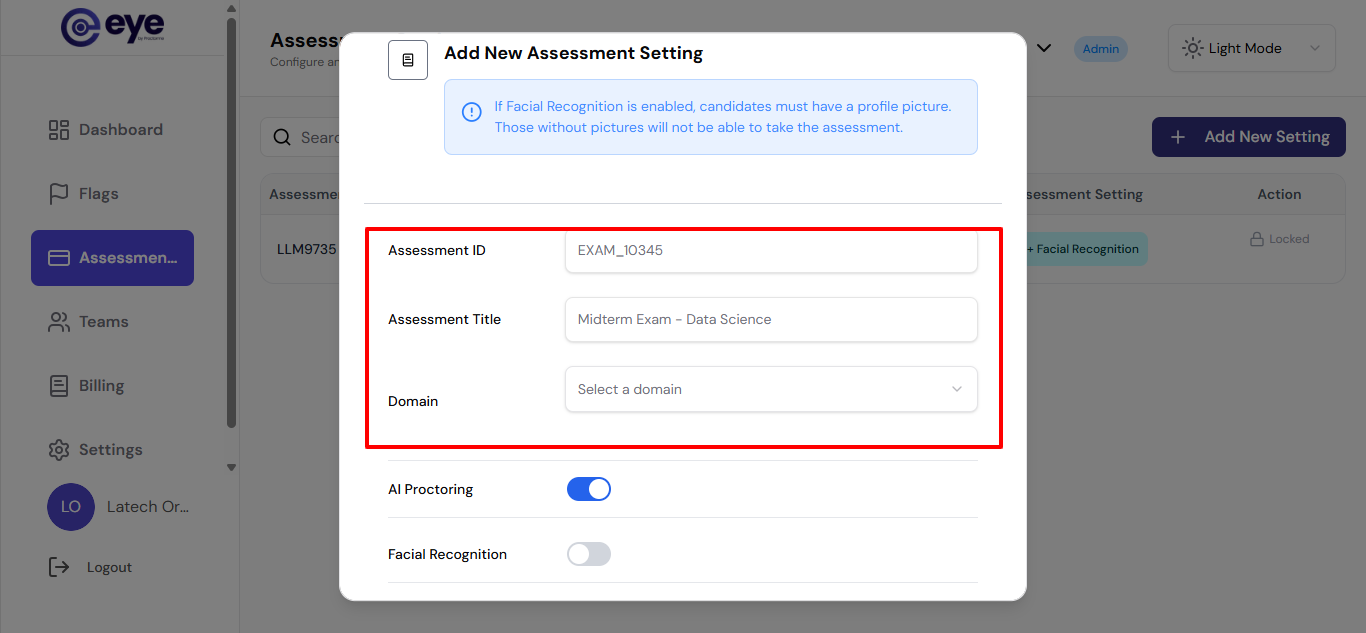
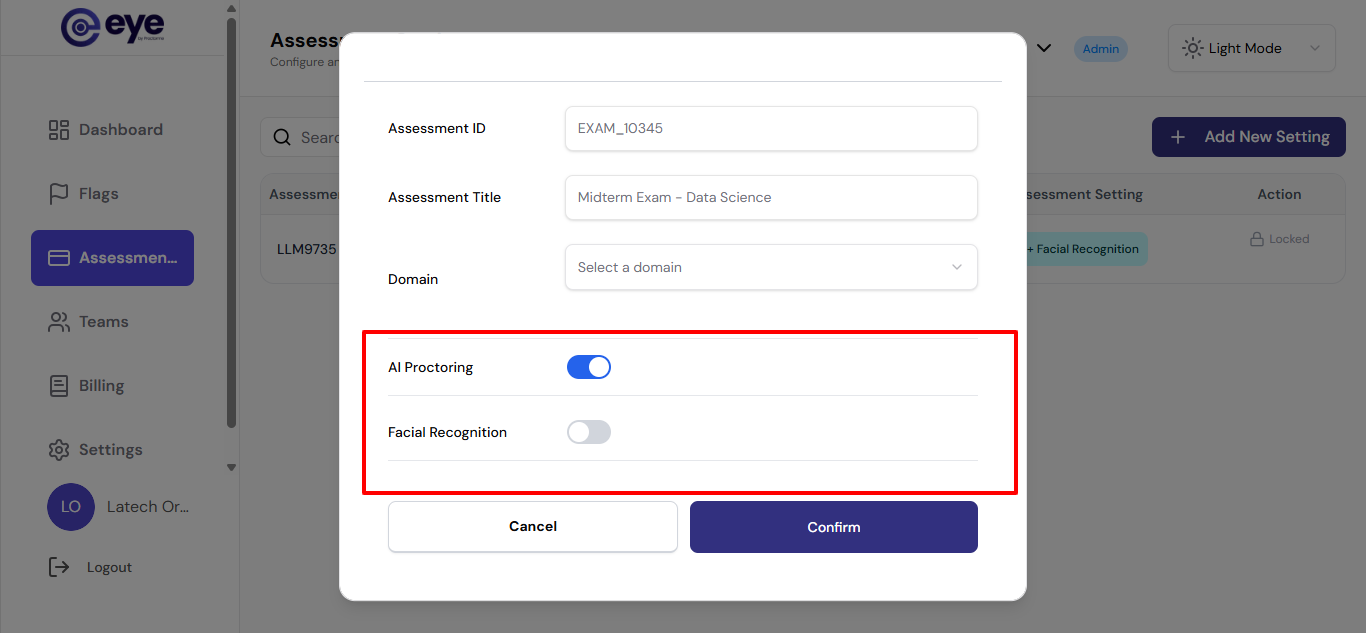
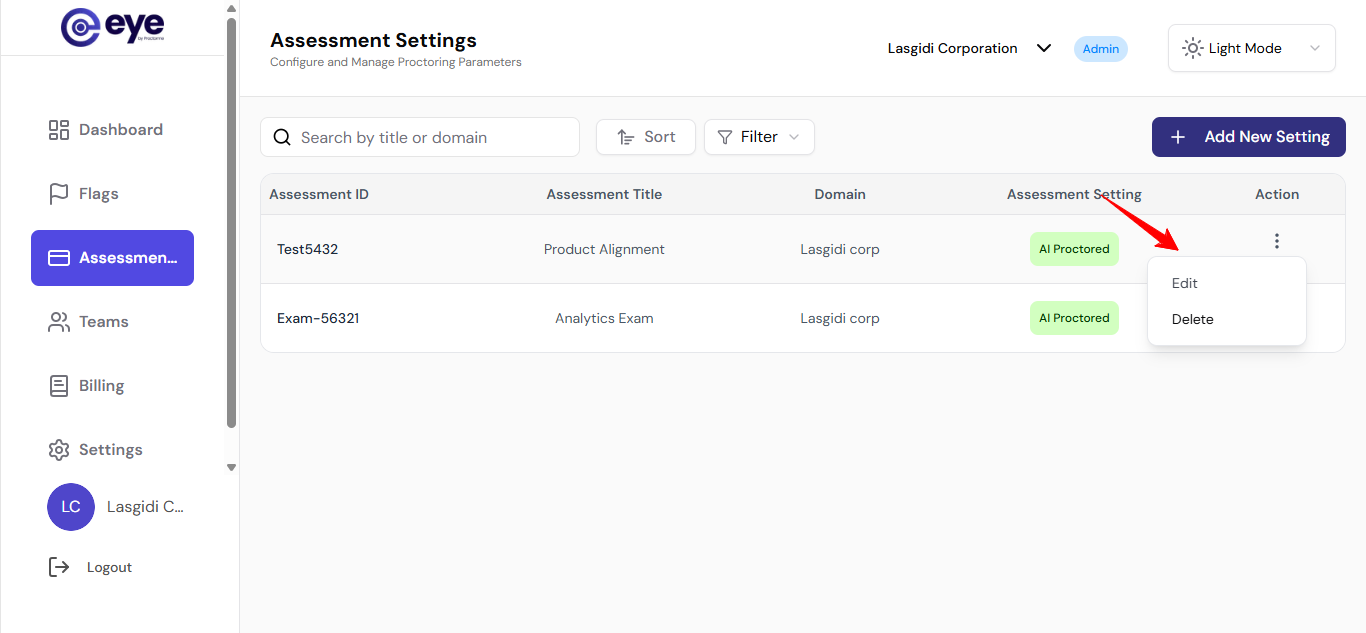
Edit or Delete an Assessment
You can edit or delete an assessment by clicking the three-dot icon next to it, as long as no candidate has taken the assessment.
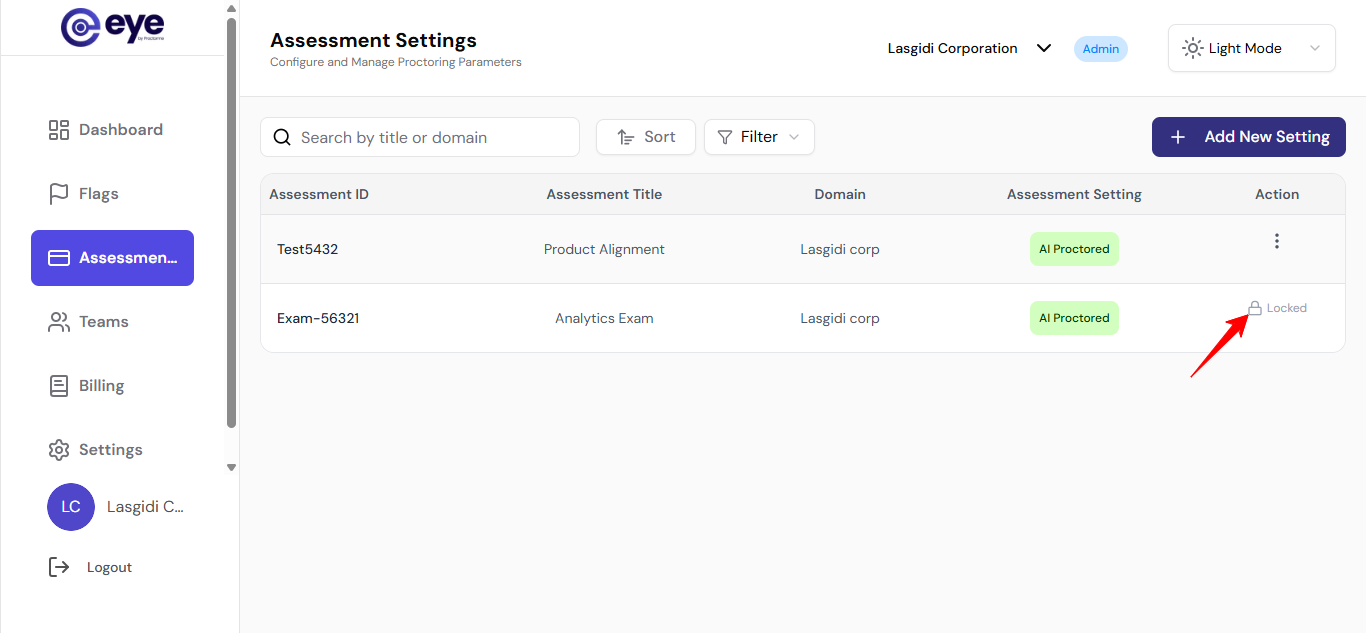
Locked Assessments
Once a candidate has taken an assessment, it cannot be edited or deleted. A “Locked” label will appear next to the assessment.
What Happens Next?
Once the assessment begins, EYE will:
- Monitor candidate activity
- Capture and flag suspicious events
- Store reviewable evidence for administrators
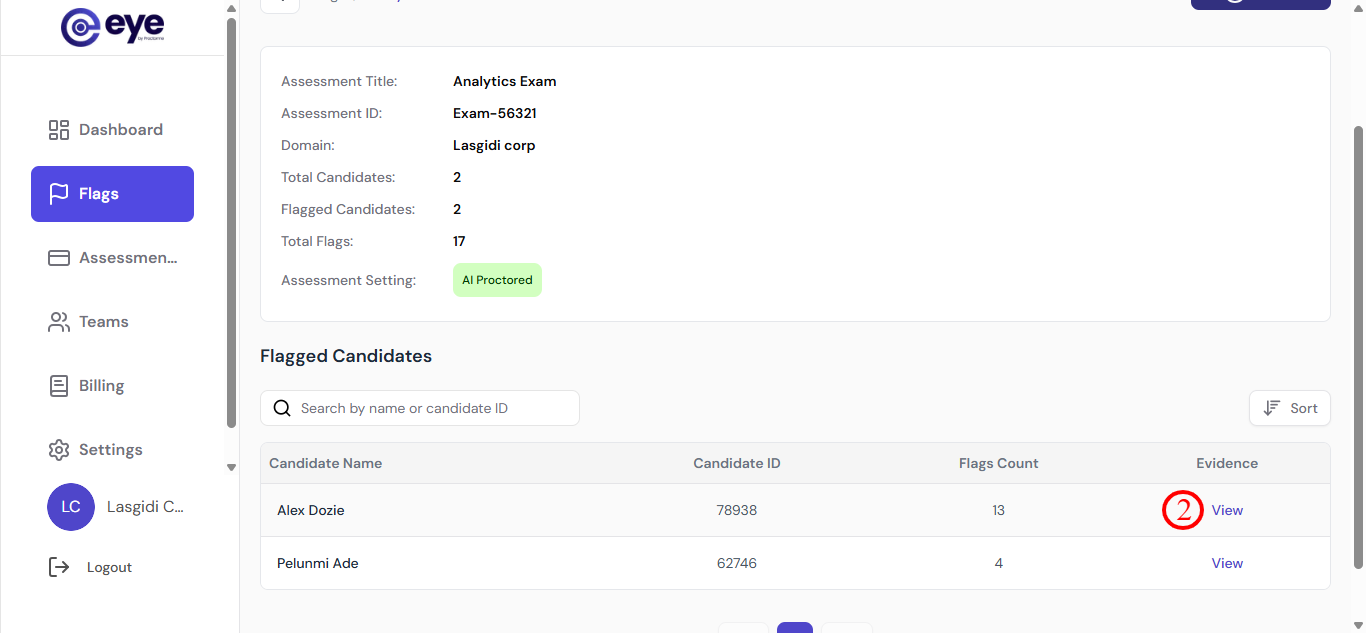
The Flags dashboard displays all candidates who triggered alerts for suspicious behavior during their proctored exams. These flags highlight sessions that may require review based on specific events detected during the assessment.
What Are Flags?
Flags are automatic alerts generated when Eye's AI detects potential integrity violations during an exam, including:
- Multiple faces detected (possible help from another person)
- Looking away from the screen for extended periods
- Unauthorized browser tab switching
- Suspicious background noise or voices
- Mobile phone or unauthorized device detected
Where to Find Flags
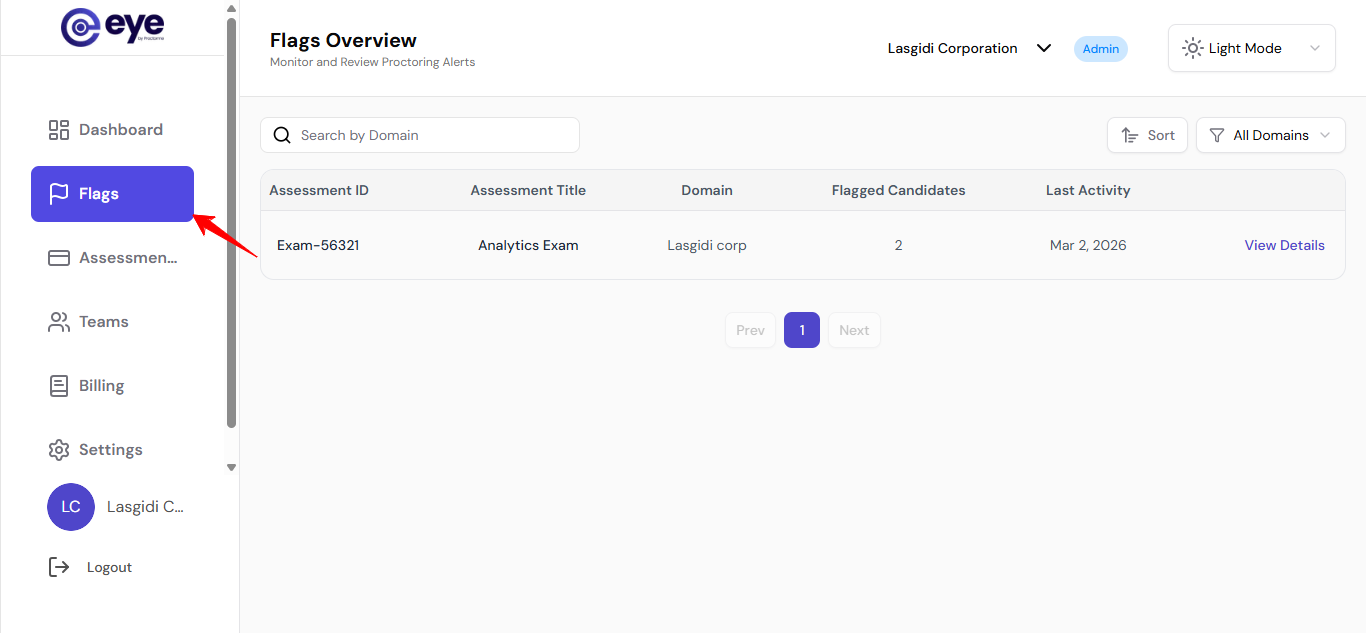
What You’ll See
For each assessment, you can view:
- Assessment ID and Title
- Domain
- Number of flagged candidates
- Last flagged activity
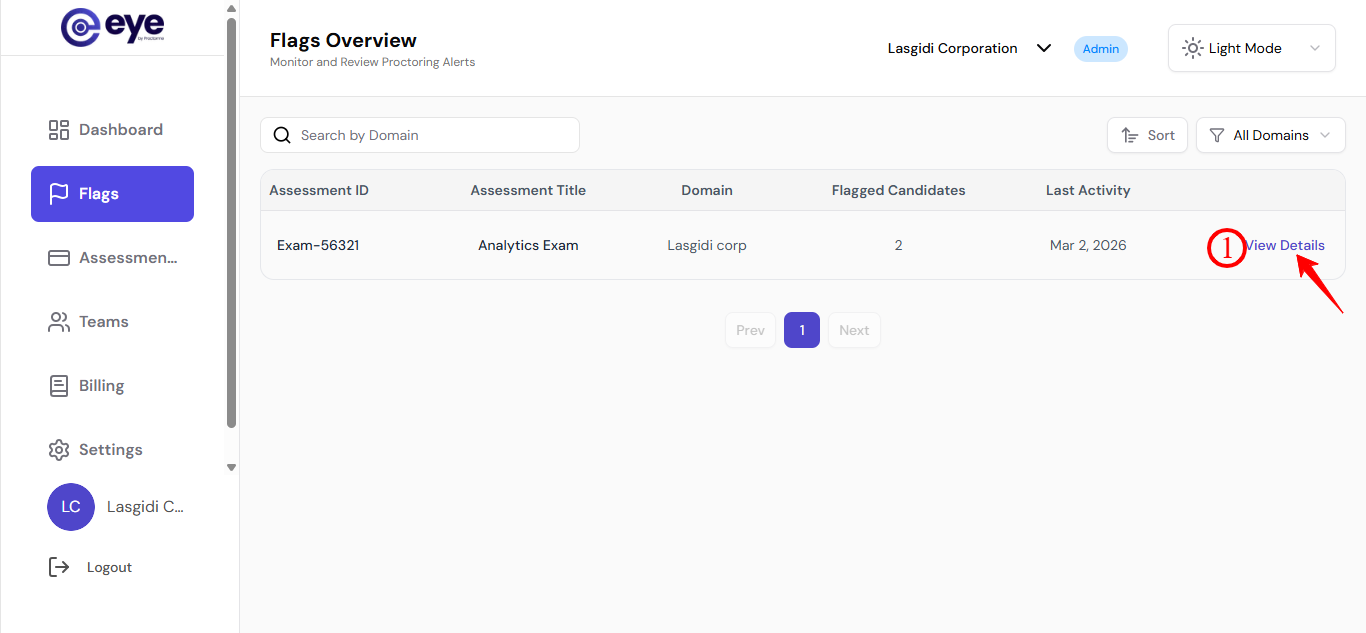
How to View Flag Details
To see more information about flagged candidates:
- Locate the assessment
- Click “View Details”
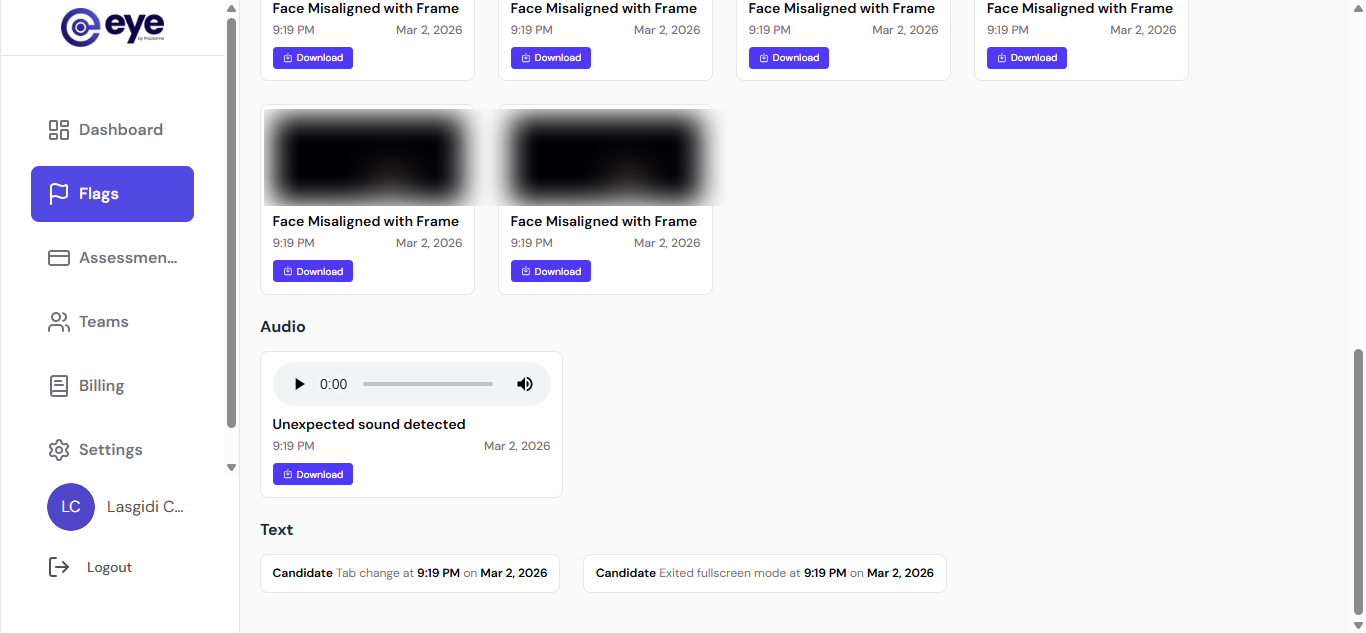
Open a candidate’s session to review:
- Flagged events
- Timestamps
- Recorded evidence
API Integration
Eye allows you to integrate your existing assessment platform, LMS, or internal system using API access.
This helps you launch proctored assessments, sync candidate data, and receive assessment results directly within your own workflow.
- Administrator access to your Eye account
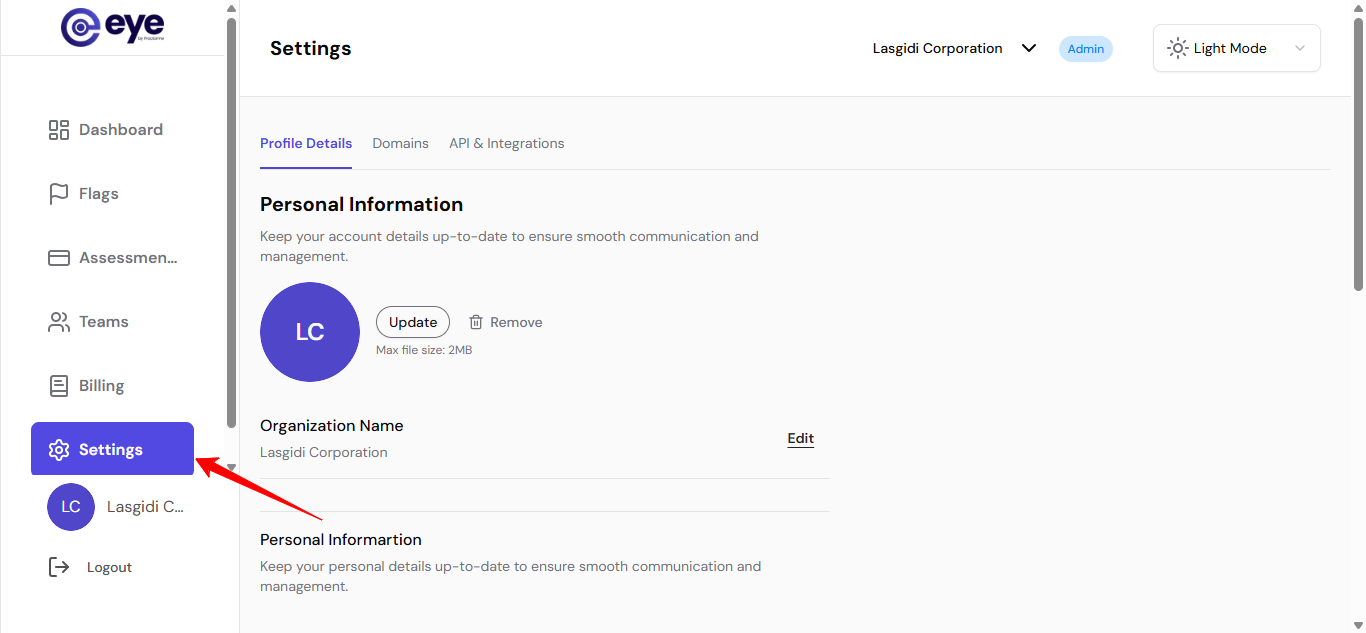
Access API Integration
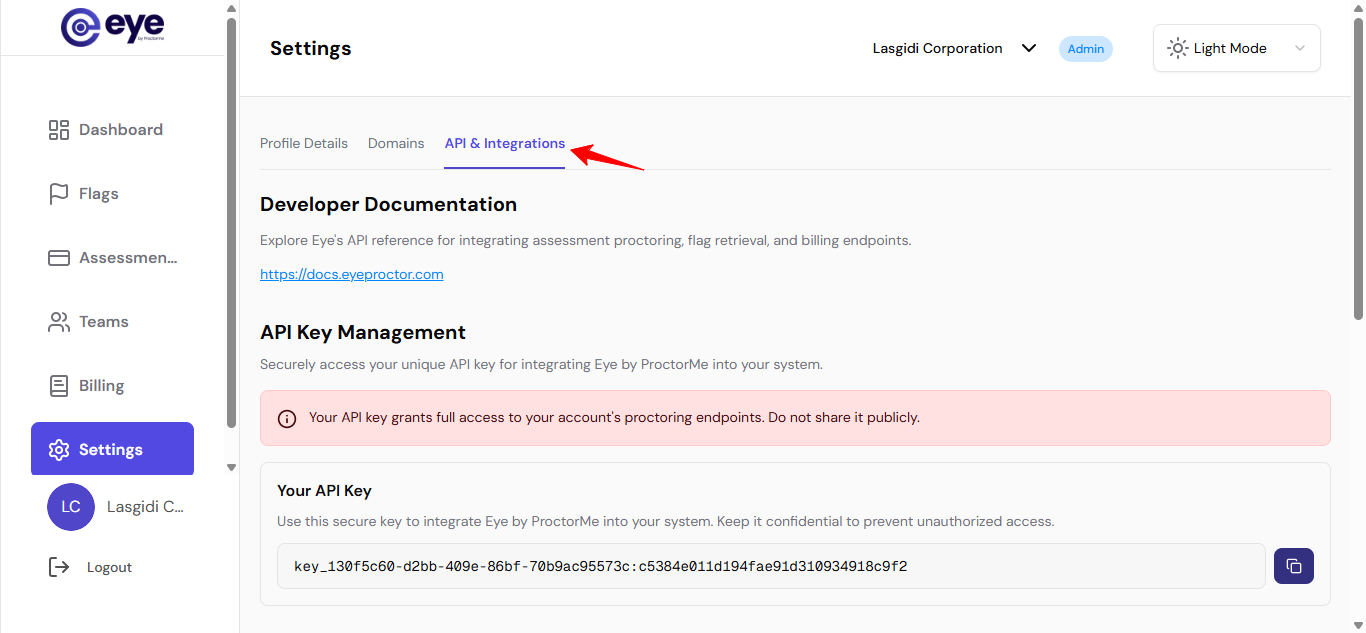
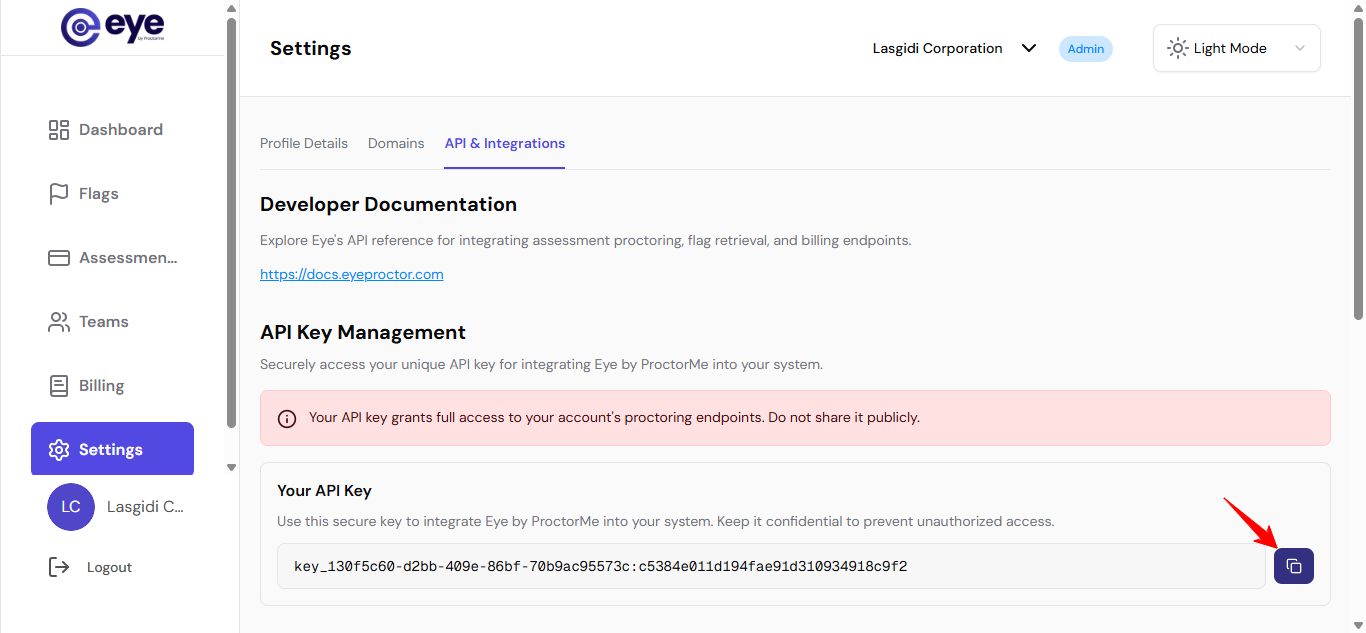
Next, add the Eye widget to your platform using this API key — see Embedding the Eye widget below.
Eye provides a lightweight widget that runs entirely in the browser via a single script.
widget.init(config), passing your API key, assessment ID, and candidate details (name, email, exam duration).For the full configuration reference, payload types, and event list, visit docs.eyeproctor.com.
The widget emits real-time events you can listen to with the onEvent callback, including:
STARTED— proctoring beginsEND_PROCTORING— proctoring endsSET_CONFIG— widget configuration is setFULLSCREEN_CHANGE— fullscreen mode changesEXIT_FULLSCREEN— candidate exits fullscreenTAB_FOCUS_CHANGE— tab focus changesTAB_NOT_FOCUS— candidate switches tabs or loses focusFACE_ABSENCE— no face detectedMULTIPLE_FACE— multiple faces detectedPERIODIC_SNAPSHOT— periodic snapshot capturedSOUND_DETECTED— sound detected during the assessmentSYSTEM_CHECK_STARTED— system checks have startedSYSTEM_CHECK_COMPLETED— system checks completed
Self-hosting your own Eye widget is available on the Enterprise plan, for organizations with strict data sovereignty or deployment requirements. Contact us at hello@eyeproctor.com for enterprise licensing and deployment guidance.
Domain Management
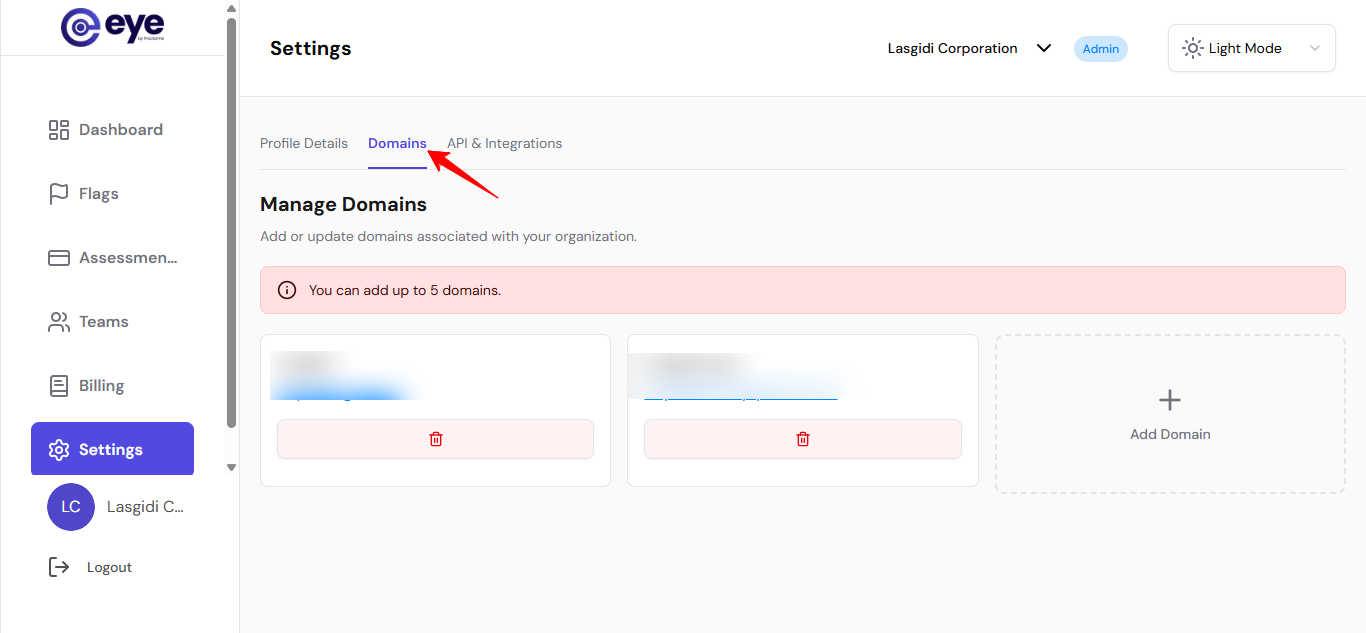
Domains in Eye Proctor allow you to organize and manage assessments under specific URLs (such as your institution's website or learning portal). This guide walks you through adding your first domain.
- An active Eye Proctor account
- The website URL you want to register
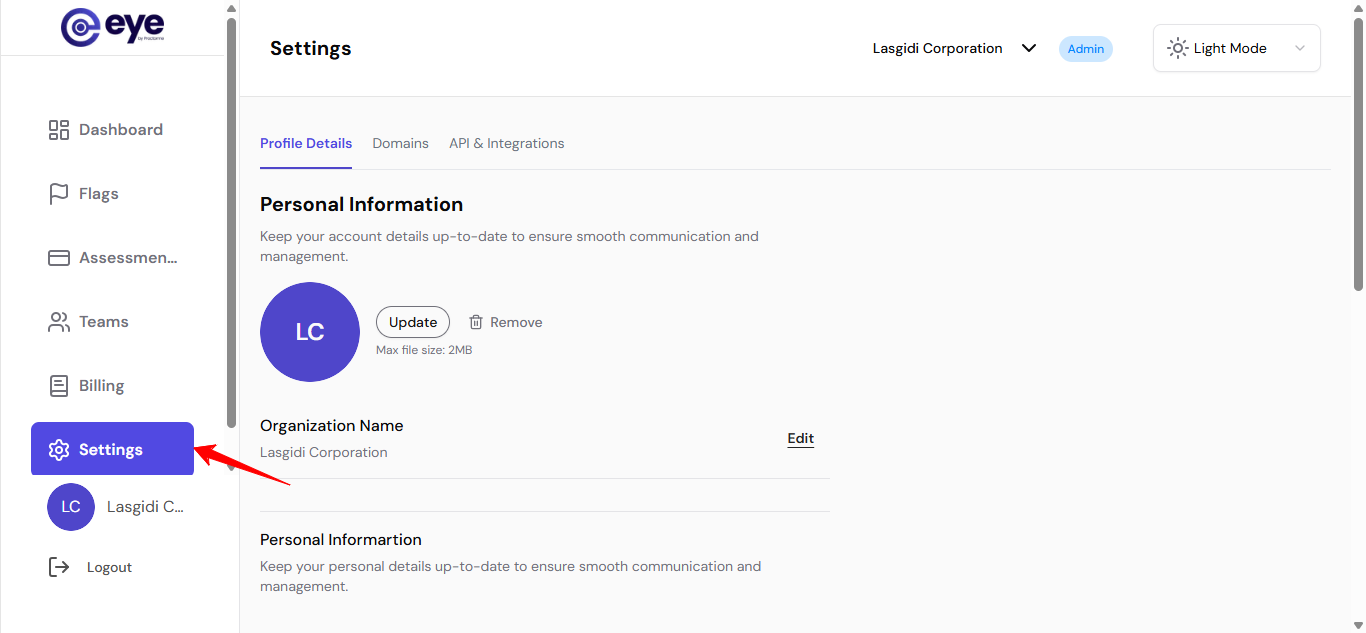
Open Settings
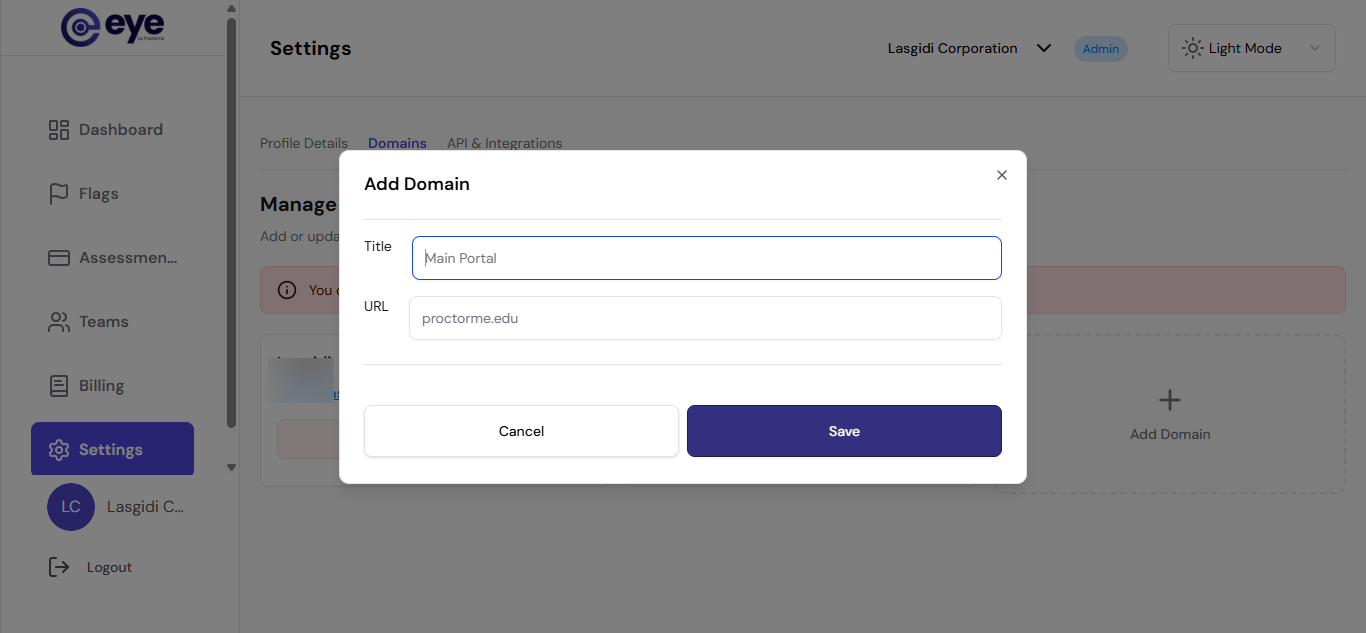
Title – Name of the domain
URL – Website address of the domain
To remove a domain from your account:
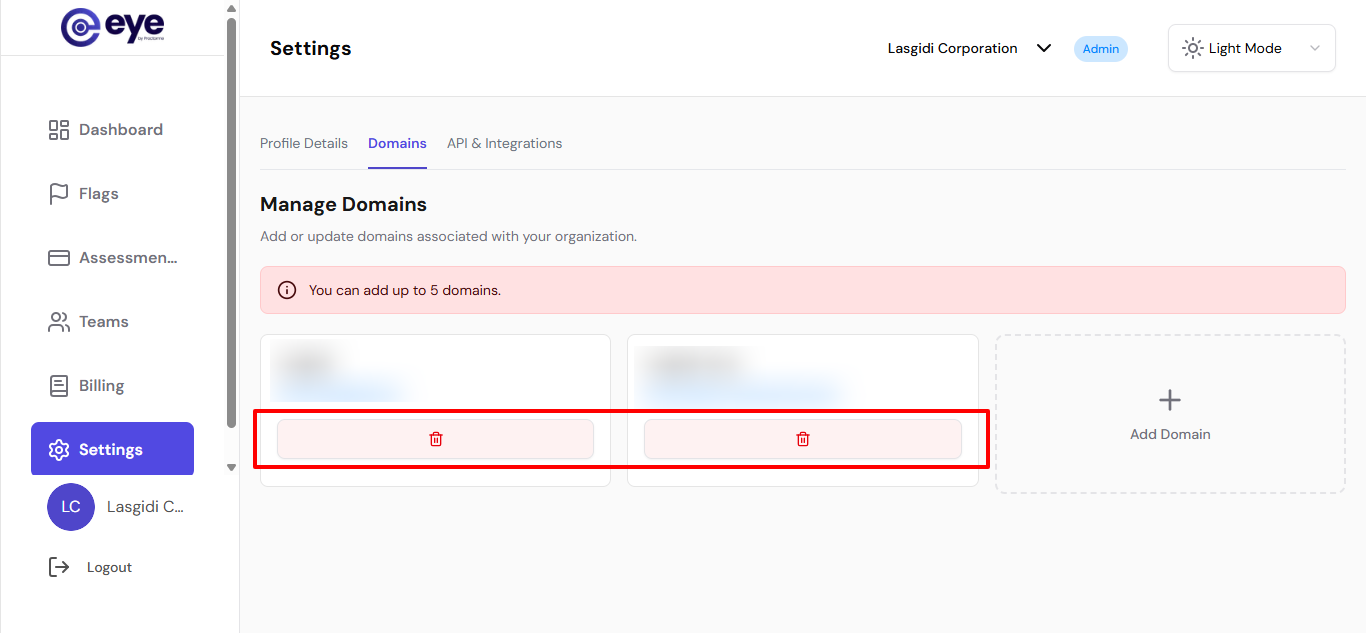
Keep these limits in mind:
- Maximum domains: 5 per account
- Cannot add more: Once you reach 5 domains, the + icon will be disabled
- Free up space: Delete an unused domain before adding a new one
Profile Management
Your profile contains your personal and company details used across Eye Proctome. This guide shows you how to edit your name, company, phone number, and email address.
Access Profile Settings
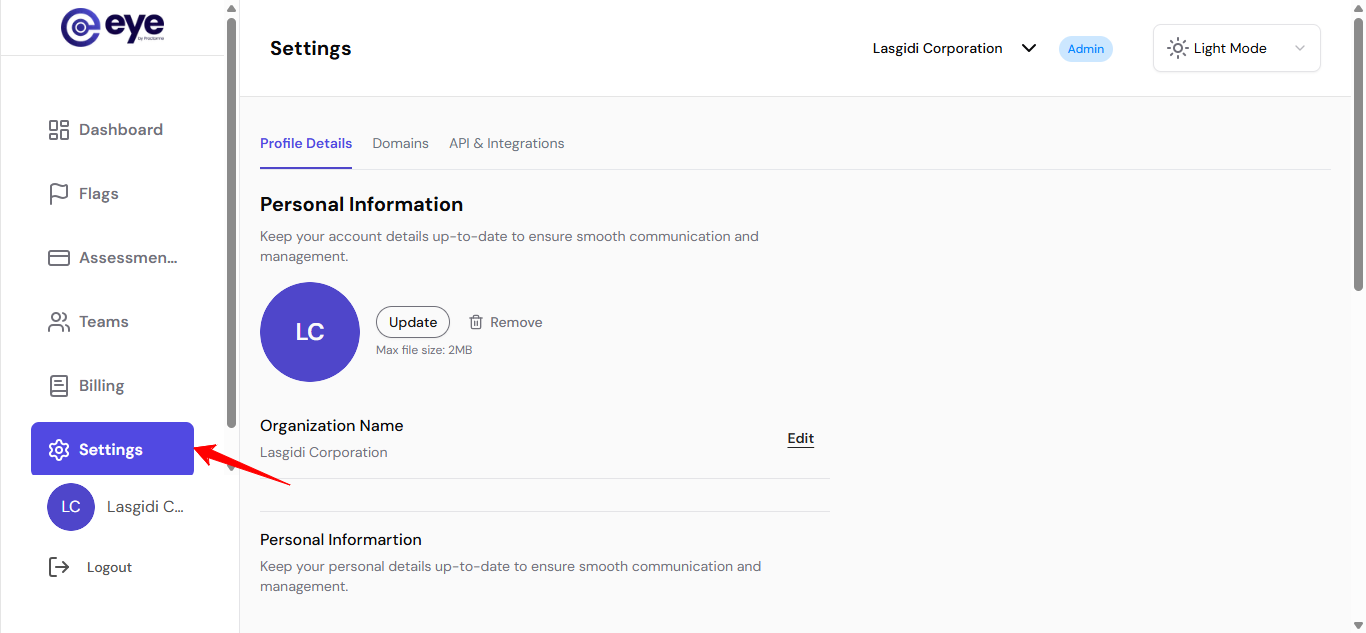
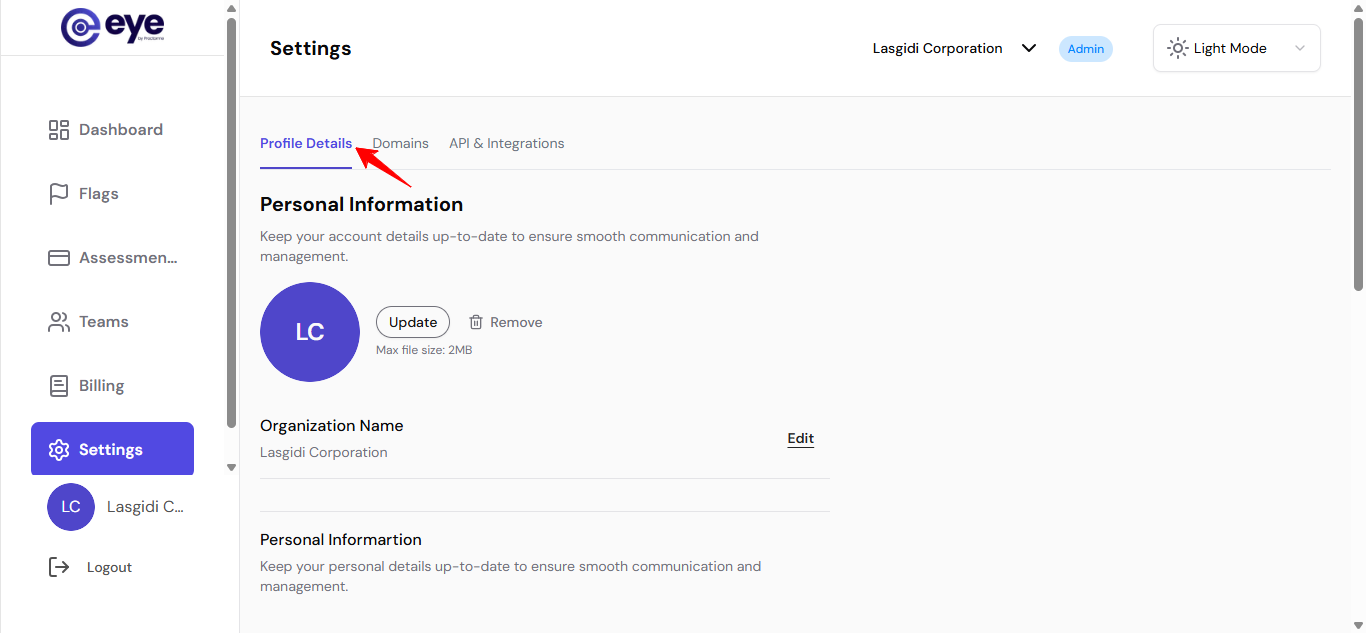
You can update your profile image at any time.
Steps:
That's it! Your profile information is now updated. Changes reflect immediately across your account.
Team Management
Eye allows you to collaborate by inviting team members to your dashboard. You can assign roles based on their responsibilities. The Teams page has two tabs:
- Members — Shows current team members
- Invites — Where you send new invitations
Open Teams
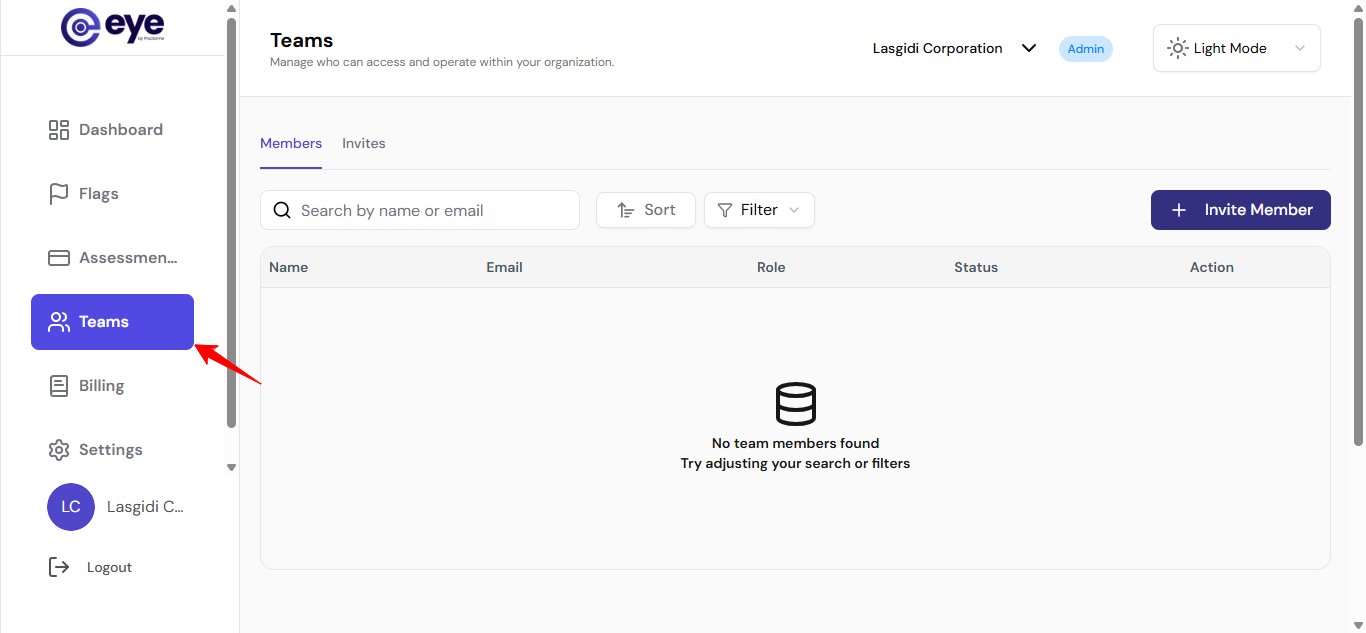
Assessment Provider – Can create and manage assessments
Reviewer – Can review flagged sessions and assessment activity
See pending invitations · Resend invites if expired · Cancel invites if sent by mistake
That's it! Once accepted, new members appear in the Members tab with their assigned role.
Different roles have different access levels.
Assessment Provider
Users with this role can:
- Create assessments
- Manage assessments
- View results
- Review flags
Reviewer
Users with this role can:
- Review flagged candidates
- View assessment activity
- Monitor sessions
Reviewer Limitations
Reviewers cannot:
- Create assessments
- Manage team settings
Billing & Payment
Your Eye Proctor wallet stores funds used to pay for assessments. This guide walks you through adding money to your account.
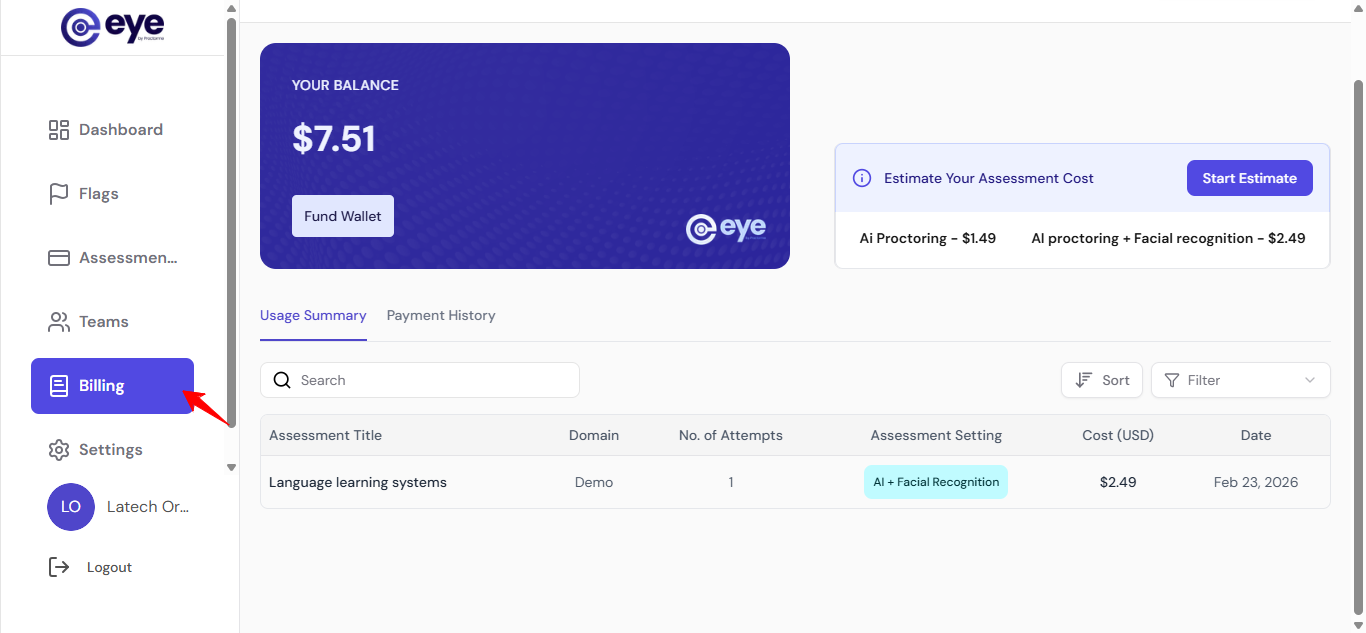
Access Billing & Payments
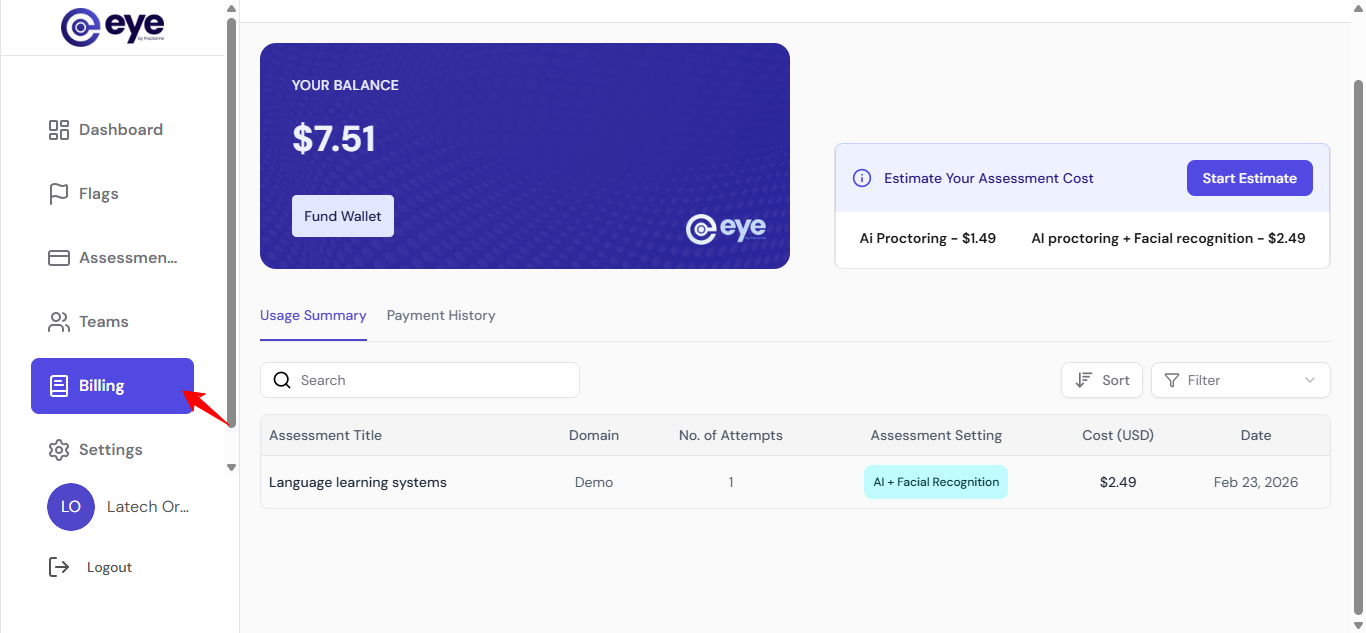
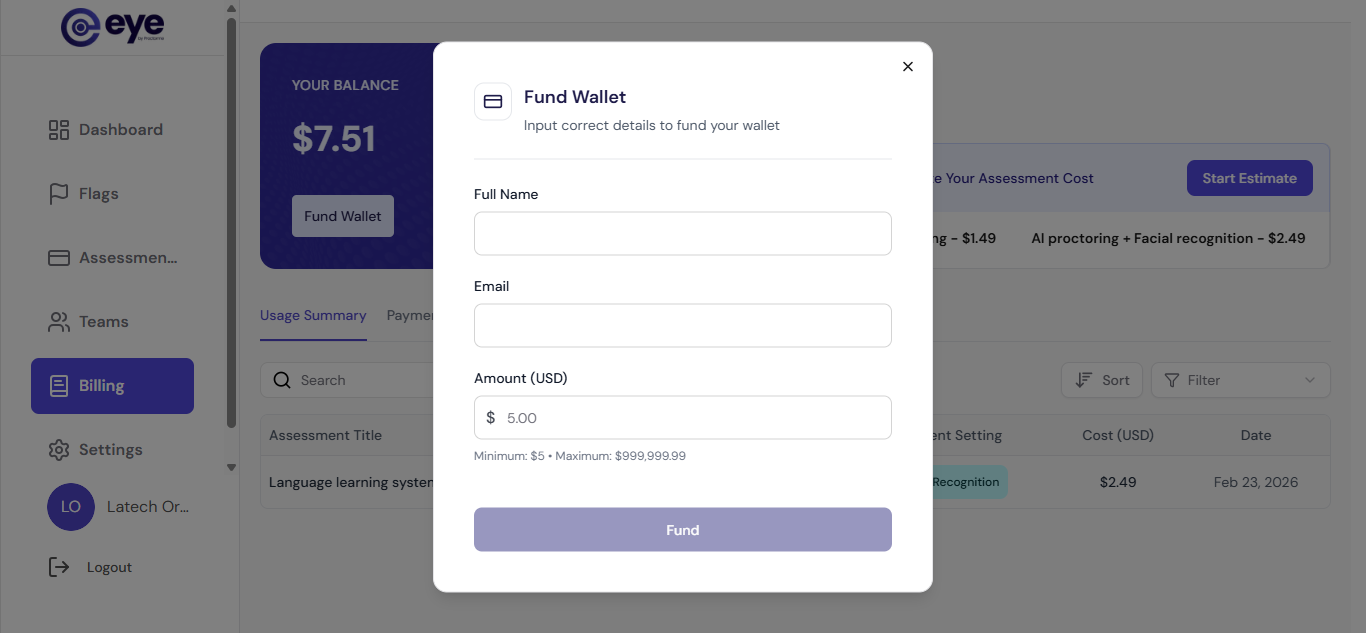
Full Name · Email Address · Amount to fund
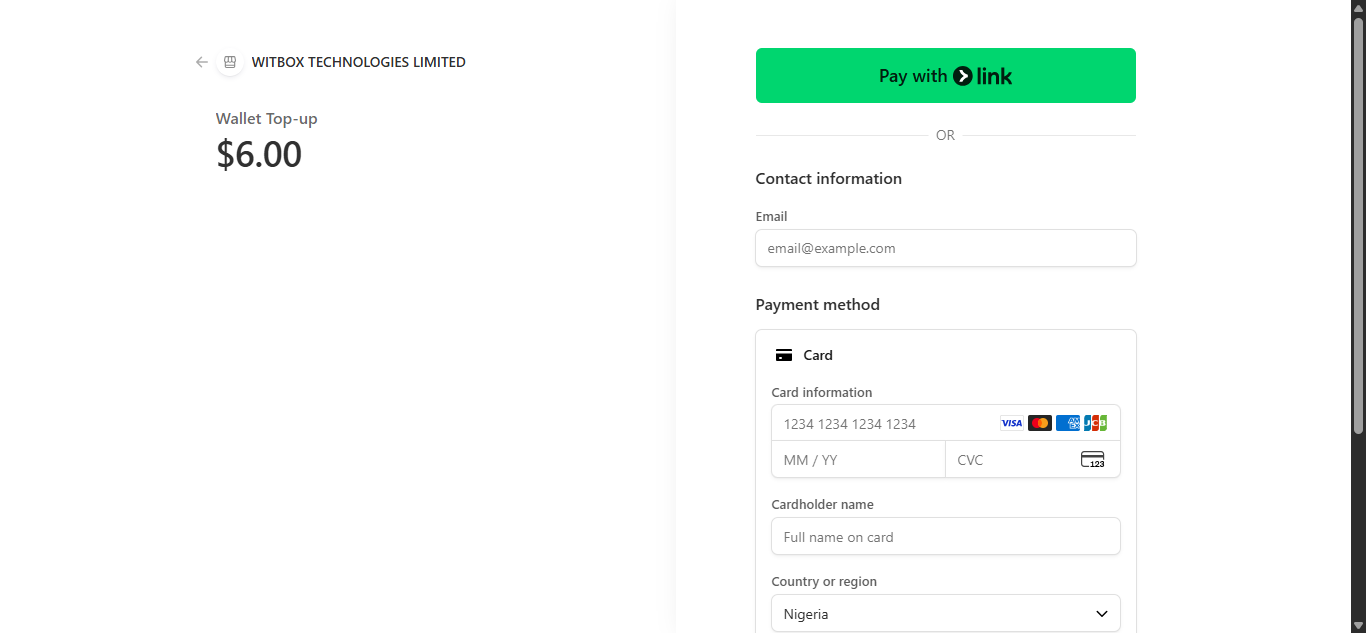
That's it! Your wallet is now funded and ready to use for assessments.
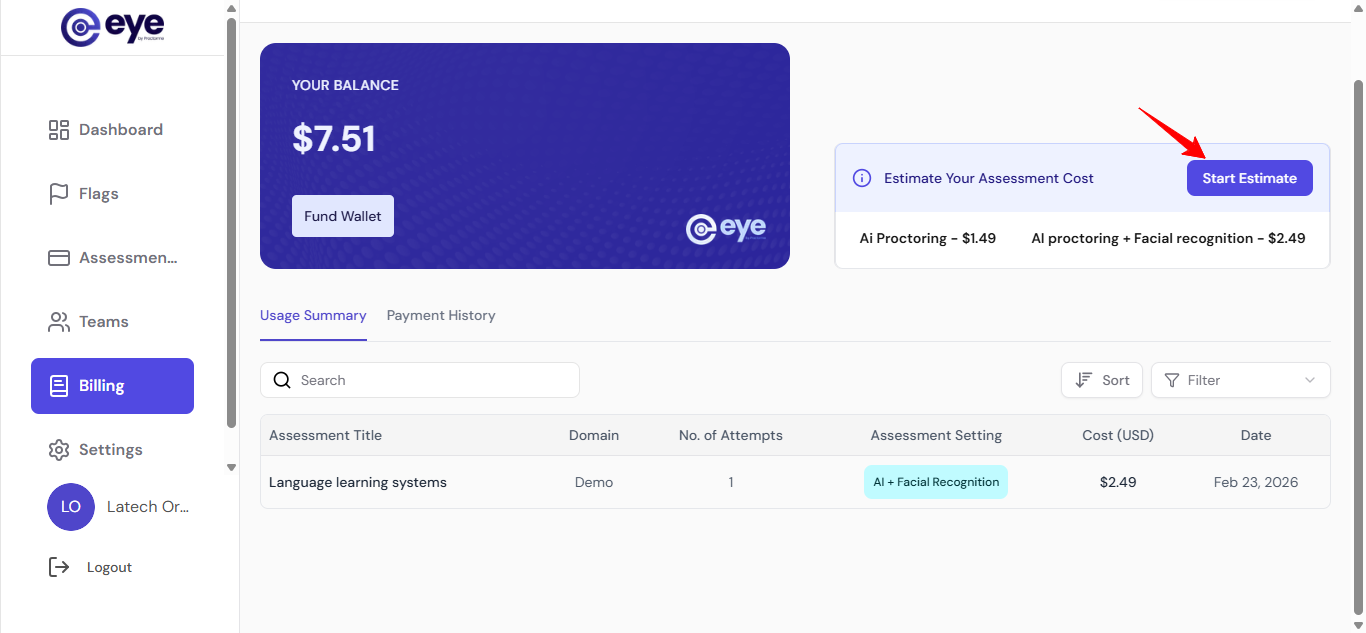
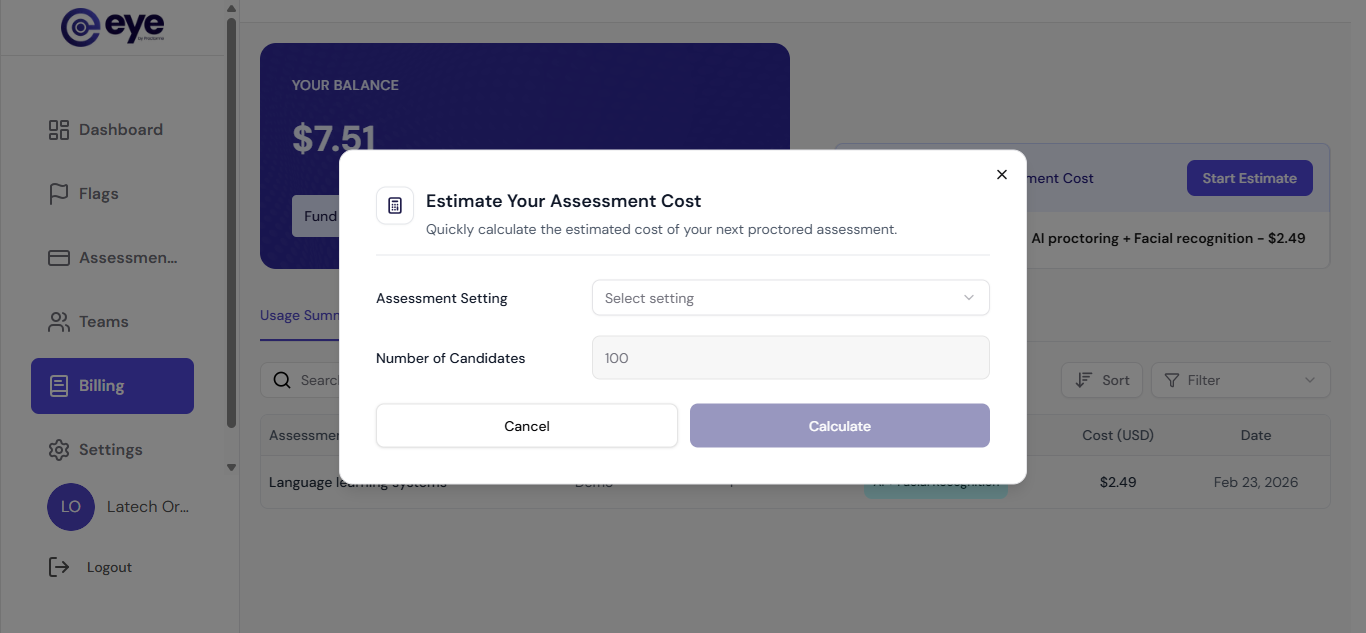
- AI Proctoring – $1.49 per candidate
- AI Proctoring + Facial recognition – $2.49
The Usage Summary provides an overview of assessments completed on your account. You can view:
- Assessment title
- Number of attempts
- Proctoring settings used
- Assessment date
Access Usage Summary
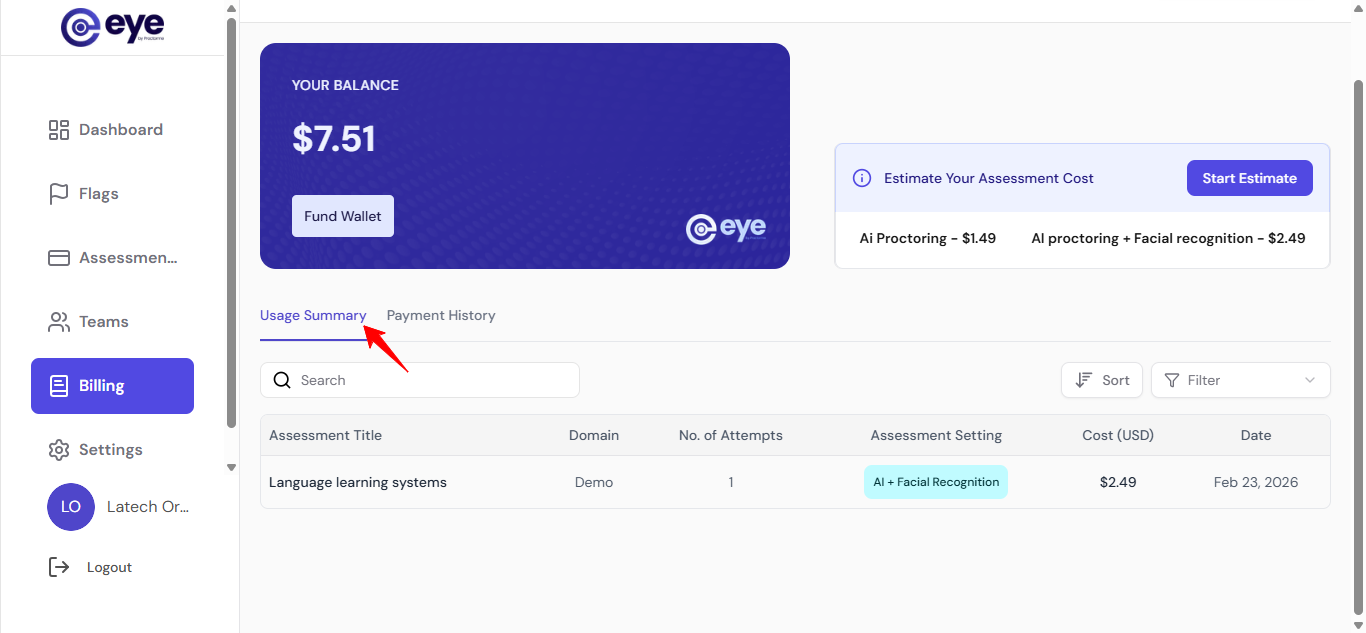
That's it! Your usage summary helps you track consumption and plan future assessments.
Your payment history records all wallet funding transactions, including amounts paid, payment methods used, and dates. This guide shows you how to access and review your billing records.
Access Your Payments
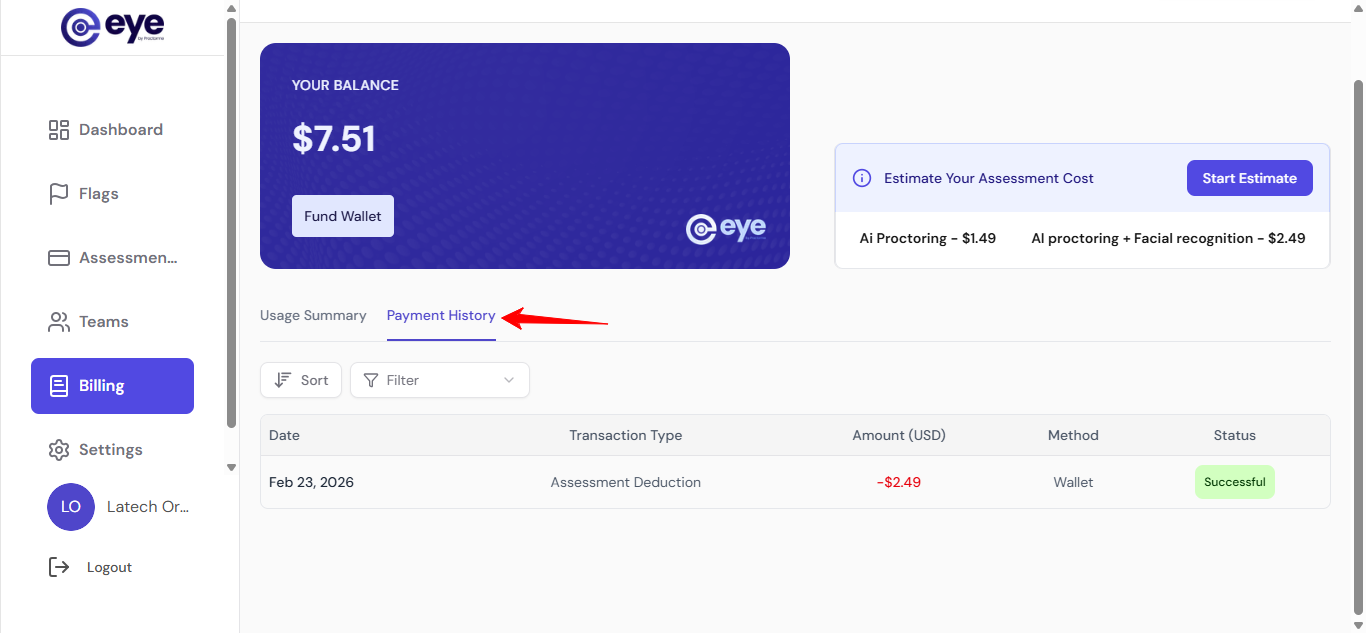
If a transaction shows Failed:
- Check that your payment method is valid
- Ensure sufficient funds or credit limit
- Retry the payment, or try a different card
- Contact your bank if issues persist
That's it! Your payment history provides a complete audit trail of all wallet funding activity.
Google Forms Add-On
form.eyeproctor.com/google-forms/…), and send that to candidates — not the Google Form's own URL.| Permission | Purpose |
|---|---|
| View and manage Google Forms | To embed proctoring settings and read form metadata for assessment configuration. |
| View Google account email | To link your Google identity to your Eye proctoring dashboard. |
| Run as add-on in Google Forms | To display the EyeProctor dialog and interact with the form interface. |
| Connect to external service | To communicate with eyeproctor.com for authentication and result syncing. |
Uninstalling does not delete your Eye account or data. To delete your account, contact support@eyeproctor.com.
Candidate Help
Eye monitors only what your administrator has configured. This may include:
- Webcam activity (face presence, multiple faces)
- Screen focus (tab switching, leaving the window)
- Browser events and behavioral anomalies
- Audio activity (if enabled by the administrator)
Eye does not continuously record video. It captures moments when events occur. You will see exactly what is being monitored before the assessment begins.
How you receive your assessment depends on your administrator — Eye doesn't send invitations itself. Once you open it, the Eye widget guides you through the same setup:
- Close any other apps using your camera (Zoom, Teams, Skype).
- Click the lock icon in your browser's address bar and set Camera to "Allow."
- Refresh the assessment page.
- If using an external webcam, ensure it is properly connected.
- Try a different browser (Chrome is recommended).
Eye simply logs the event — switching tabs is recorded and added to your session timeline. There is no automatic penalty or "strict mode." If it was accidental, return to the assessment tab and continue normally; administrators can review the context of your session afterwards.
It depends on the assessment. Check with your administrator for device requirements. Some assessments require a desktop or laptop for screen monitoring. If mobile is allowed, use Safari (iOS) or Chrome (Android) in portrait mode.
Privacy & Security
No. Eye is event-driven and does not continuously record video. It captures event-triggered webcam snapshots and audio recordings only when a monitored event occurs — never a continuous video feed. This is a core privacy principle of the platform.
Your institution does. The assessment administrator retains ownership of all assessment results; Eye processes the data on the institution's behalf.
On the hosted platform, proctoring data is retained for 1 year from the assessment date and is deletable on request — email hello@eyeproctor.com.
With self-hosted deployments, all data stays on the institution's own infrastructure and Eye has zero access — the institution controls retention entirely.
Consent is a three-step process:
- Access: Your administrator shares the assessment link or makes it available on their platform.
- Pre-assessment: A screen shows exactly what will be monitored before the assessment begins.
- Explicit consent: The candidate must click "I understand and consent" to proceed. If declined, the candidate is routed to the administrator.
Eye never records without the candidate's explicit knowledge and consent.
Eye is built with data protection in mind. For UK/EEA users, we process data under GDPR — on the bases of contractual necessity, legitimate interests, legal obligation, and consent (for biometric/facial-recognition data). For minors, we rely on institutions to obtain parental or guardian consent as required by COPPA. Our use of Google data follows the Google API Services Limited Use requirements.
Compliance is shared: Eye provides the secure platform and tools; institutions configure and operate it according to their legal obligations. For specific compliance questions, contact support@eyeproctor.com.
Troubleshooting
- Ensure the add-on is installed from the Google Workspace Marketplace.
- Refresh the form and reopen it: Extensions → EyeProctor → Settings.
- Newly installed add-ons may take a few minutes to appear in all forms.
- Verify you are signed into the same Google account used during installation.
- If your Workspace admin restricts third-party apps, ask them to whitelist EyeProctor.
- Verify the assessment access window is open and has not expired.
- Ensure the candidate is using a supported browser (Chrome, Firefox, Safari, Edge).
- Confirm the candidate allows camera access when prompted.
- Check that the assessment is not locked or expired in your Eye dashboard.
- Make sure the Google Form is published — if it's still a draft, candidates can't load it.
- Send candidates the Eye assessment link (
form.eyeproctor.com/google-forms/…), not the Google Form's own URL.
- Confirm you opened EyeProctor → Settings for the form (this creates the assessment) before candidates started.
- Check that the form is linked to the correct assessment in your Eye dashboard.
- Ensure candidates completed the assessment using the shared link.
- Verify your API credentials are correct (for custom integrations).
Each Eye account supports a maximum of 5 domains. Delete an unused domain from Settings → Domains before adding a new one. Domains linked to active assessments cannot be deleted until the assessment is archived.
Contact Support
| Support Type | Contact |
|---|---|
| Support | support@eyeproctor.com |
| General enquiries | hello@eyeproctor.com |
| Documentation | docs.eyeproctor.com |
Standard support hours: Monday – Friday, 9:00 AM – 6:00 PM UTC.
Enterprise customers: Priority support with a 4-hour SLA response time.
To help us resolve your issue faster, please include:
- Your account email or assessment ID
- A clear description of the issue
- Steps you've already tried
- Screenshots (if applicable)
- Browser and OS version
For urgent issues, email support@eyeproctor.com with your assessment ID.
Still need help?
Can't find your answer? Our support team is just one message away.